Thanks to the good reception of the previous post, where I described my project of an e-ink dashboard to visualize events and weather using the E1001 terminal from SeeedStudio, in this guide, I will explain step-by-step how to flash your own customized terminal.
Additionally, I’ll leave a few links in case you haven’t acquired the terminal yet.
LINK: [https://s.click.aliexpress.com/e/_c39JPkAd]
[https://www.seeedstudio.com/reTerminal-E1001-p-6534.html?sensecap_affiliate=roDgS6q&referring_service=link] SeeedStudio link with discount applied at the end.
If you haven’t seen my previous post, I recommend reading it: I explain good design practices that can be very useful for future embedded systems engineering projects.
1. Installing the Arduino IDE
We need the IDE to compile the code and adapt it to your Google Calendar, location, and other parameters.
Guide and download here: [Link to download and install Arduino IDE]
2) Downloading the Code
The code is available in the GitHub repository: https://github.com/myembeddedstuff/EinkDashboard_reTerminale1001
Clone the repository.
Open the
.inofile using the Arduino IDE.- You may see a warning indicating that the
.inofile must be located in a folder with the same name. If this happens, click Accept, and a new folder will be created automatically. Then, move the remaining files into the same directory where the.inofile is located.
3) Setting Up the Environment
3.1) Adding ESP32 Board Support
Go to File -> Preferences.
In Additional Boards Manager URLs, add:
https://raw.githubusercontent.com/espressif/arduino-esp32/gh-pages/package_esp32_index.json

3.2) Installing the Board
Go to Tools -> Board -> Boards Manager.
Search for esp32.
Install the esp32 by Espressif Systems v3.3.4.

3.3) Selecting the Correct Board
Tools->Board -> esp32 -> XIAO_ESP32S3
3.4) Connecting the Board
Connect the reTerminal E1001 to your computer via USB.
3.5) Selecting the Port
Tools -> Port and choose the correct COM port.
4) Installing Libraries
Go to Tools -> Manage Libraries and install the following:
| Librería | Autor | Versión |
|---|---|---|
| GxEPD2 | Jean-Marc Zingg | 1.6.5 |
| Sensirion Core | Sensirion | 0.7.2 |
| SensirionI2CSHT4x | Sensirion | 1.1.2 |
| ArduinoJson | Benoit Blanchon | 7.4.2 |
| Adafruit GFX Library | Adafruit | 1.12.4 |
| Adafruit BusIO | Adafruit | 1.17.4 |
5) Editing the Code (config.h)
This is the most tedious part of the tutorial: we’ll need to edit our config.h file with our own custom configuration. To do that, we have to set up several things, and we’ll need multiple APIs in order to access the data we require.
Open the config.h file from the IDE or with a text editor.

5.1) Configuring WiFi Credentials
Edit the following with yout 2.4GHz WiFi Network.
EDIT_WIFI_SSID
EDIT_WIFI_PASSWORD5.2) Configuring the Google Calendar API
5.2.1) Creating an API Key
1.Log in: https://console.cloud.google.com/apis/dashboard
2.Select a project ->Create new project.
3. Go to Enabled APIs and Services -> Enable APIs and Services.
5. Create the API Key. Click on Credentials -> Create Credentials – API KEY

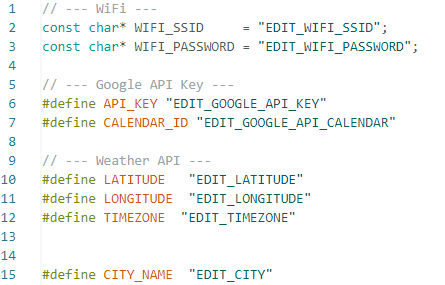
6. Copy your API KEY to settings.h -> API_KEY.
5.2.2) Getting Your Calendar ID
1. Go to: https://calendar.google.com/calendar
2. Go to Settings.
3. In the left column, choose the calendar to sync.
4. Activate public visibility only for access with the API Key (it will not be visible to anyone else without the key).
5.Copy the CALENDAR_ID to config.h. CalendarID parameter can end with @group.calendar.google.com or @gmail.com; copy it in full.
5.3) Configuring the Weather API (Open-Meteo)
Edit the following parameters in config.h:
LATITUDELONGITUDETIMEZONE(IANA)
Timezone Examples:
| Europa | América | Asia |
|---|---|---|
| “Europe/Madrid” | “America/Mexico_City” | “Asia/Tokyo” |
| “Europe/London” | “America/Los_Angeles” | |
| “Europe/Berlin” | “America/New_York” |
Testing the API in the Browser
Example for Madrid:
https://api.open-meteo.com/v1/forecast?latitude=40.4168&longitude=-3.7038&hourly=temperature_2m,weathercode&daily=weathercode,temperature_2m_max,temperature_2m_min¤t_weather=true&timezone=Europe/MadridIf you see the JSON output, your configuration is correct. You can now edit the config.h

6) Compiling and Uploading the Code
Once config.h is configured:
Perform Verify / Compile in Arduino IDE
Perform Upload to the board.
Open the Serial Monitor to view logs and debug possible errors.
The screen is refreshed each hour.
If this tutorial has been helpful, consider buying me a coffee! (Link at the bottom of the page)
Got Questions? Help Me Create an FAQ!
If you find any issues during the configuration or code upload, please leave your question in the comments. With your questions and solutions, I will be building a Frequently Asked Questions (FAQ) section in this very post to make it increasingly comprehensive and useful for the entire community.

