
I’ve always wanted a device at home for a long time that would let me see at a glance, every morning while I have my coffee, what I need: the weather, my upcoming events, and some sensor data. I tried several solutions until I discovered a device that was perfect for this purpose. It saved me a lot of time in hardware development and was fully customizable to suit my needs.
I’d like to share the development of my small project using the reTerminal E1001 e-paper display hardware from Seeed Studio. In this post, I will discuss the display’s hardware, how I used the Arduino IDE to program it, the architectural schematic I followed, and the tools I used for the graphical design.
Table of Contents
ToggleHardware Review: Analyzing the reTerminal E1001
The reTerminal E1001 is a hardware device that incorporates a 7.5-inch monochrome electronic ink display. While the E1002 version with color exists, for this project, I preferred having only two colors.
The board features an ESP32-S3 control unit, along with internal temperature and humidity sensors, several buttons, a microphone, a uSD card slot, and a built-in battery (2000mAh). All of this is integrated into a very well-finished metal case, which discretely hides the hardware on the back.
LINK: https://s.click.aliexpress.com/e/_c39JPkAd
Edit: SeeedStudio link with discount applied at the end. https://www.seeedstudio.com/reTerminal-E1001-p-6534.html?sensecap_affiliate=roDgS6q&referring_service=link

Ecosystem and Programming Methods
Regarding programming, the device offers several methods:
Sensecraft Tool.
TRMNL.
Integration with Home Assistant.
Manual programming with Arduino IDE.
Manual programming with ESP-IDF.
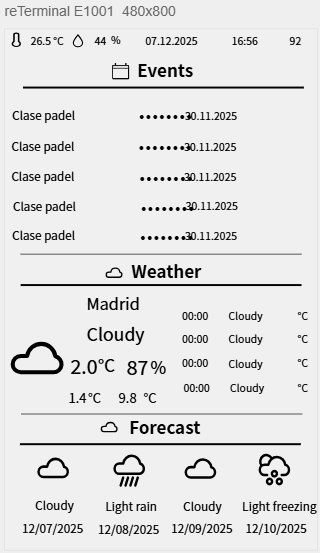
Each approach has its advantages and disadvantages. I first tried Sensecraft because I wanted a quick result, and honestly, I had the right image functional dashboard in 30 minutes. It is a powerful and very easy-to-edit online graphical tool, offering several pre-set and easily configurable designs.
The drawback, which they might fix in the future, is that you are limited to basic implementations. For example, when I wanted to retrieve events from my Google Calendar via its API, I ran into the problem that I had no parameter to only show future events. The closest I could do with the Google Calendar API was passing the current timestamp, which would only report subsequent events. The issue I encountered was that there was no way to automate the system to send the updated date every day, making this approach non-functional for my goal.
If this is not a problem for you, and you can use the tool without the need for automation, it is the best option.
I also tried tools that allow creating custom automated APIs. My idea was to create my own API that would automatically call the Google API with the updated date, thus retrieving the data. This is a viable solution, but I personally didn’t like having to rely on so many external dependencies.
I discarded TRMNL because it is paid software, but from what I’ve gathered, it seems like a fairly professional tool, similar to Sensecraft Tool.
Regarding the Home Assistant method, it can be a very good alternative if you already have a server running Home Assistant. Since I don’t, I discarded this option.
Of the remaining two, I followed the simpler path using the Arduino IDE, although I will likely integrate it with ESP-IDF in the future.
Software Design
API's usage
First, it is important to understand how APIs work, as this is the basis of my software. APIs are a way to make requests to certain websites to retrieve data of interest. For example, by making a request to OPEN-METEO with specific parameters, we can retrieve the weather conditions for our location.
For example, by making that request with modified LATITUDE and LONGITUDE data, we can obtain a JSON result with the weather data for our location:
By parsing this in our software, we can obtain the specific data we want to represent.
State machine
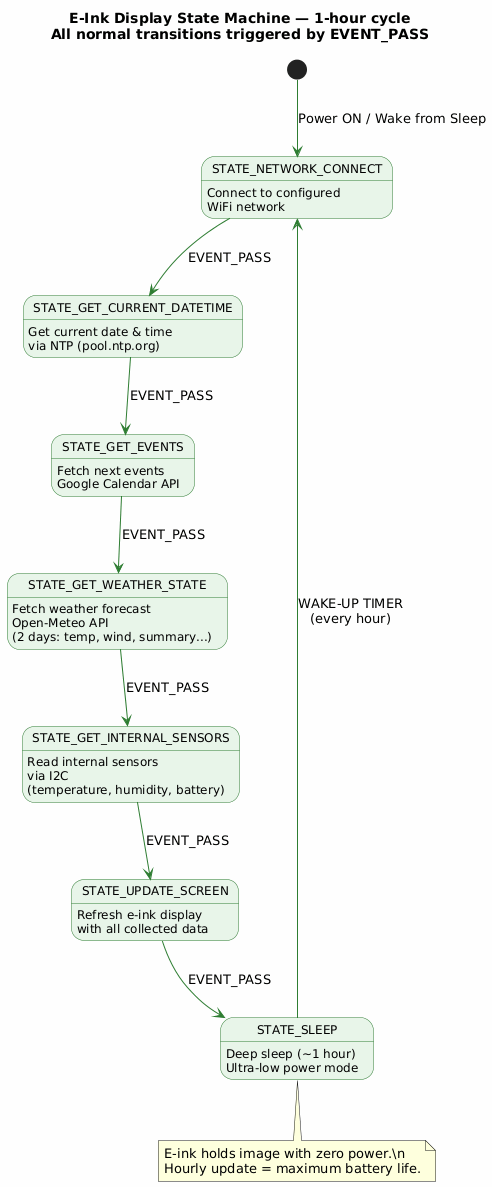
As for my software, I decided to structure everything into a State Machine. This approach might not be as common when working with the Arduino IDE, where one usually creates simple things using the SETUP and LOOP functions. However, when a project starts to grow, loop() quickly becomes chaotic. Therefore, the state machine allowed me to divide everything into clear steps, avoid blocking loops, and handle errors without halting execution. This is very useful for scaling the project easily in the future.
I based my state machine on seven states. They are all implemented to only handle two types of events: EVENT_PASS or EVENT_NO_PASS. If the state completes all tasks correctly, it transitions to the next state with an EVENT_PASS; if a failure is reported, it will repeat the current state several times with EVENT_NO_PASS events until the maximum number of attempts is exceeded.
| State | Task Description |
|---|---|
| STATE_NETWORK_CONNECT | State for connecting to the configured Wi-Fi network. |
| STATE_GET_CURRENT_DATETIME | Uses NTP servers (pool.ntp.org) to synchronize and retrieve the device’s current time. |
| STATE_GET_EVENTS | Using the Google Calendar API, retrieves $n$ subsequent events starting from a selected date. |
| STATE_GET_WEATHER_STATE | Using the Open-Meteo API, retrieves the weather conditions for the next two days for the desired location. |
| STATE_GET_INTERNAL_SENSORS | Reads the temperature, humidity, and battery measurements from the internal sensors (I2C connection). |
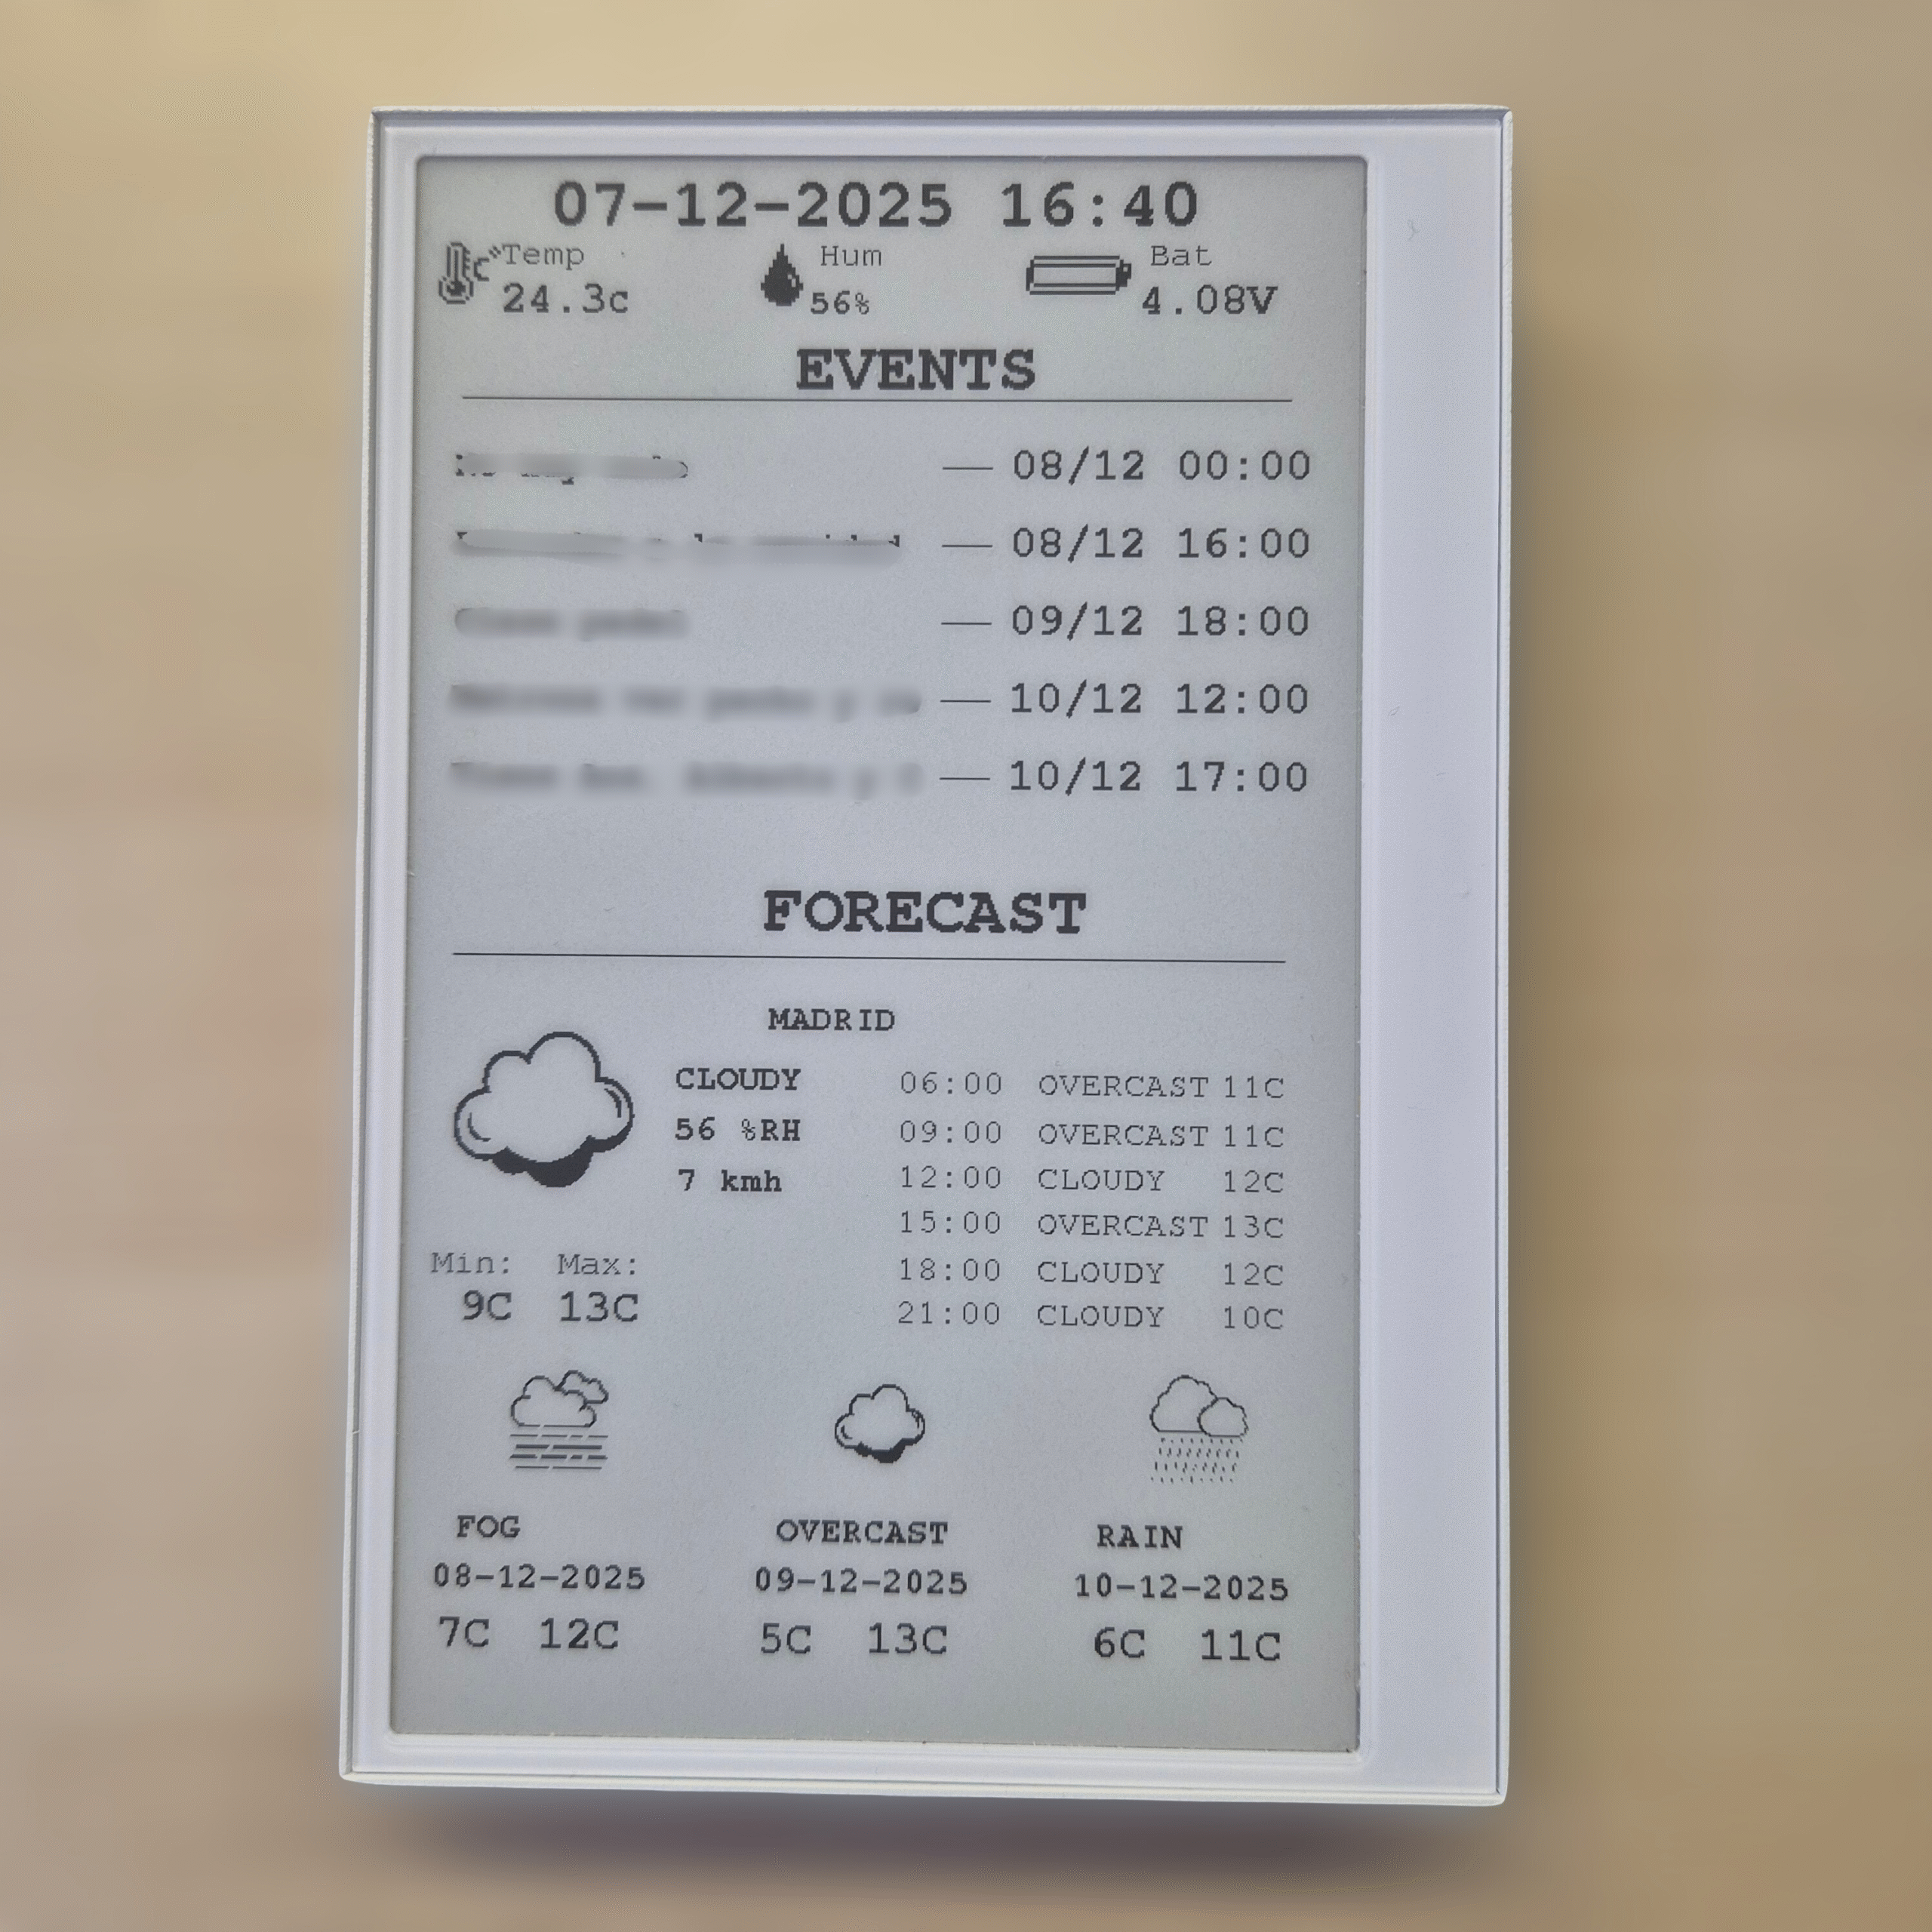
| STATE_UPDATE_SCREEN | Draws (refreshes) the e-ink screen using the defined Layout and all collected data. |
| STATE_SLEEP | Puts the device into **Deep Sleep** mode to wake up in one hour and repeat the process, drastically reducing battery consumption. |
Graphic Design and Resources Used
For the graphic design, I used a tool I discovered for this project called LOPAKA. I found it to be a high-level, free tool for graphic design. It allows easy configuration of everything, enabling the definition of different platform types for generating the resulting code: ESPHome, Arduino GFX, Micropython, etc.
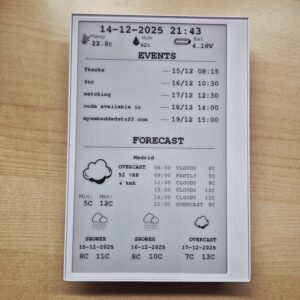
I used Arduino GFX to generate the code. For example, this is the preliminary design I created, which I then exported to my code. I modified certain parameters to adapt it slightly to my needs, but the foundation comes from this application.

For generating the byte arrays for images that were not implemented by Lopaka app, I used the website https://javl.github.io/image2cpp/, which is also very simple to use. We can upload images and generate the byte array from them with various configuration options for both colors and size.
Conclusions
Would you like me to publish the complete code and the ready-to-compile project? If you are interested, leave me a comment or write to me using the form. I am preparing a guide with:
Complete Code
Project Configuration Guide
API Configuration
Leave me your email and I will send it as soon as it is ready.


Great project and post ! Thanks for sharing. Leaving my contact to show my interest in getting the code as I’m planning to make one for this Christmas as mentioned on Reddit. Thanks, Fred
Thanks!
Wow, you’ve built exactly what I had in mind. Amazing work. I’d love to take a look at the code if you’re willing to share it
Thanks! 🙂
Pingback: Project: Developing an E-Paper Dashboard with Arduino and the reTerminal E1001 (Step-by-Step Guide) - myembeddedstuff.com
Same. Lovely to see. Code when ready please as i will make this my next project
Hi Forrest, the code is ready in the following post: https://myembeddedstuff.com/project-dashboard-arduino-guide
I came across this and would love to attempt this as a project! If your willing to share your code, I would love that.
Hi Parker, here is the step-by-step guide, https://myembeddedstuff.com/project-dashboard-arduino-guide