Serverless e-Ink Photo Frame: Using Google Drive for unlimited storage

f you want to build your own e-Ink Photo Frame but want to forget about setting up local servers (Raspberry Pi, NAS, or Home Assistant) and don't want to rely on SD cards, this project is for you.The biggest hurdle when using e-Ink displays for photos is the infrastructure. Normally, you need a 24/7 dedicated server to process the images or pay for third-party services. Additionally, microcontrollers like the ESP32 face two critical constraints: Processing: Running a dithering algorithm (to adapt a real photo to the screen's limited color palette) is too heavy for an ESP32. Memory: High-quality images consume too much RAM during HTTP requests, often leading to crashes or overflow errors. To solve this, I decided to use Google Drive as…

0 Comments

CHEAPEST DIY E-PAPER PICTURE FRAME. IKEA HACK

Digital e-paper frames have become very popular lately. They are the perfect addition to any desk or living room, but when I looked into buying one, the prices seemed completely out of orbit. We’re talking about extremely high prices for what they actually offer. I preferred to find a way to build my own: customizable and, above all, much more affordable and, why not, based on an IKEA frame that costs just a few euros.I found the 13.3-inch Spectra displays with support for up to 6 colors. While researching suppliers, I came across the XIAO ePaper DIY (EE02) kit from Seeed Studio. What’s interesting about this kit is that, besides the panel, it includes a controller board with everything you need to get…

3 Comments

How to Create a Custom RP2350 Magic Ball (Elon Musk Edition)

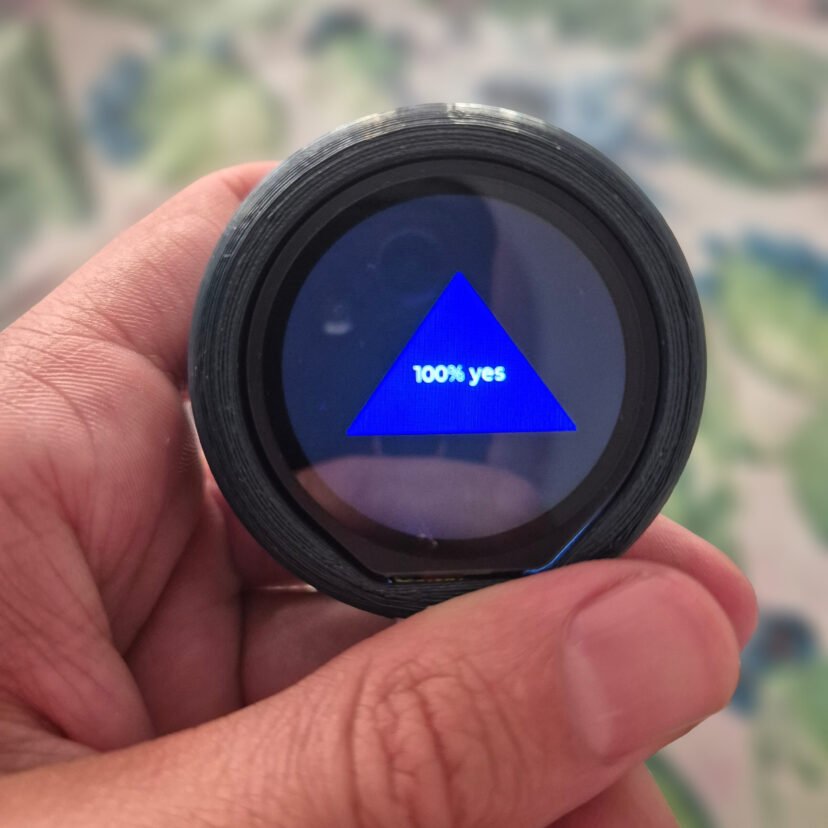
Over the last few weeks, I’ve been experimenting with round LCD displays to see what they can really do. The moment I held one in my hand, I had a total Toy Story flashback: Woody asking the Magic 8-Ball for advice.I never actually owned one as a kid, so I thought... why not build my own? But let's take it a step further. Instead of the classic cryptic answers, why not get advice from Elon Musk, Clint Eastwood, or your favorite celebrity? That’s how the RP2350 Magic Ball project was bornFor those who don't know, the Magic Ball was invented in 1946. It is a ball with the appearance of a billiard ball containing an icosahedron floating in liquid. This icosahedron has answers…

0 Comments

Project: Developing an E-Paper Dashboard with Arduino and the reTerminal E1001 (Step-by-Step Guide)

Thanks to the good reception of the previous post, where I described my project of an e-ink dashboard to visualize events and weather using the E1001 terminal from SeeedStudio, in this guide, I will explain step-by-step how to flash your own customized terminal. Additionally, I'll leave a few links in case you haven't acquired the terminal yet. LINK: [https://s.click.aliexpress.com/e/_c39JPkAd]  [https://www.seeedstudio.com/reTerminal-E1001-p-6534.html?sensecap_affiliate=roDgS6q&referring_service=link] SeeedStudio link with discount applied at the end.  If you haven't seen my previous post, I recommend reading it: I explain good design practices that can be very useful for future embedded systems engineering projects. https://myembeddedstuff.com/dashboard-arduino-e1001 1. Installing the Arduino IDE We need the IDE to compile the code and adapt it to your Google Calendar, location, and other parameters. Guide and download…

0 Comments

Project: Developing an E-Paper Dashboard with Arduino and the reTerminal E1001

I've always wanted a device at home for a long time that would let me see at a glance, every morning while I have my coffee, what I need: the weather, my upcoming events, and some sensor data. I tried several solutions until I discovered a device that was perfect for this purpose. It saved me a lot of time in hardware development and was fully customizable to suit my needs. I'd like to share the development of my small project using the reTerminal E1001 e-paper display hardware from Seeed Studio. In this post, I will discuss the display's hardware, how I used the Arduino IDE to program it, the architectural schematic I followed, and the tools I used for the graphical design. I…

9 Comments